

Learn SQL Basics to Retrieve, Filter, Sort, and Manage Data Like a Pro
Now that you have a foundational understanding of what databases are—knowing your tables from your rows and your columns from your primary keys—it is time to get your hands dirty. Theory is essential, but SQL basics are best learned by doing.
In this comprehensive SQL tutorial, we are going to move beyond definitions and start communicating directly with the database. You are about to learn the specific language required to fetch exactly the data you need, a skill that is central to the daily workflow of data analysts, developers, and product managers worldwide.
By the time you finish reading this guide, you will have mastered the four cornerstones of data retrieval:
- Retrieve data from specific tables using
SELECT.- Filter records to find exactly what you are looking for using
WHERE.- Sort results into meaningful lists using
ORDER BY.- Limit the output to keep your results manageable using
LIMIT.
These four commands might seem simple, but they make up the vast majority of SQL queries you will write in your career. Let’s dive in.
🚀 What Are SQL Queries?
Before we start typing commands, let’s clarify what we mean by a “query.” In the context of databases, a query is simply a question or a request for information.
When you go to a library and ask, “Can you show me all the mystery novels written after 2010?”, that is a query. You are specifying:
- What you want: Mystery novels.
- The condition: Written after 2010.
SQL queries work exactly the same way. SQL (Structured Query Language) allows you to ask these questions in a structured format that the database understands. Instead of speaking English, you use specific keywords to tell the computer precisely what data to pull from storage.
Why Is This Important?
In modern applications, data is rarely just “sitting there.” It is being constantly accessed and analyzed.
- E-commerce: “Show me all customers who bought a laptop yesterday.”
- Finance: “Find the top 5 highest transactions for this month.”
- HR: “List all employees in the Marketing department sorted by hire date.”
SQL gives you the power to ask these questions without needing to manually open a massive spreadsheet and scroll through a million rows. It is efficient, fast, and scalable.
🔹 SELECT – The Foundation of Data Retrieval
The SELECT statement is the “Hello World” of SQL. It is the very first command you will use in any SQL for beginners course because it is the primary way we get data out of the database.
Think of SELECT as pointing your finger at the specific columns of data you want to see.
The Basic Syntax
The grammar of SQL is straightforward. To grab data, you need two things:
- SELECT: What columns do you want?
- FROM: Where do those columns live (which table)?
SELECT column_name
FROM table_name;
Example: Fetching Names
Imagine we have a table called employees. If you want to see a list of just the names of everyone working at the company, you would write:
SELECT name
FROM employees;
What happens here?
The database locates the employees table, finds the column labeled name, and lists every single entry in that column. It ignores the salary, the department, and the ID. It gives you only what you asked for.
Selecting Multiple Columns
Data usually requires context. Seeing a list of names is okay, but seeing names next to their salaries is better. To learn SQL effectively, you need to know how to grab multiple attributes at once. You do this by separating column names with a comma.
SELECT name, salary
FROM employees;
Common Beginner Mistake: Do not put a comma after the final column name!
- ❌
SELECT name, salary, FROM employees;(Incorrect) - ✅
SELECT name, salary FROM employees;(Correct)
The “Select All” Wildcard (*)
Sometimes, you don’t know exactly what columns are in a table, or you just want to see everything to get a lay of the land. In this case, you use the asterisk (*), often referred to as the “star” or “wildcard.”
SELECT * FROM
employees;
Meaning: “Show me every single column for every single row in the employees table.”
📌 Pro Tip: Why You Should Avoid SELECT *
While SELECT * is great for a quick check during a SQL tutorial, it is considered bad practice in professional, production-level coding.
- Performance: If your table has 100 columns and 1 million rows, fetching “everything” puts a huge load on the database server.
- Clarity: Listing specific columns makes your code easier for others to read. They know exactly what data the query is supposed to return.
🔹 WHERE – Filtering Your Data
If SELECT is about choosing columns (vertical slices of data), WHERE is about choosing rows (horizontal slices of data).
Without the WHERE clause, you get every record in the table. If you have 50,000 employees, you get 50,000 rows. Usually, you only care about a specific subset. The WHERE clause allows you to set conditions that rows must meet to be included in your results.
The Syntax
The WHERE clause always comes after the FROM clause.
SELECT column_name
FROM table_name
WHERE condition;
Example: Finding Specific Employees
Let’s find everyone who works in IT.
SELECT * FROM employees
WHERE department = 'IT';
🧠 How the Database Thinks:
The database looks at the first row. Does the department equal ‘IT’?
- Yes? Add it to the result pile.
- No? Discard it and move to the next row.
Working with Text vs. Numbers
Notice in the example above, we used quotes around 'IT'.
- Text/Strings: Must always be wrapped in single quotes (e.g.,
'IT','New York','John'). - Numbers: Do not use quotes (e.g.,
50000,10,2.5).
Common WHERE Operators
To write effective SQL queries, you need to master the comparison operators.
| Operator | Meaning | Example | Interpretation |
|---|---|---|---|
= | Equal to | WHERE salary = 50000 | Exact match needed. |
!= or <> | Not equal to | WHERE department != 'HR' | Everything EXCEPT HR. |
> | Greater than | WHERE salary > 50000 | Salary strictly higher than 50k. |
< | Less than | WHERE salary < 50000 | Salary strictly lower than 50k. |
>= | Greater than or equal | WHERE age >= 21 | 21 or older. |
<= | Less than or equal | WHERE age <= 18 | 18 or younger. |
🔹 AND / OR – Combining Multiple Conditions
Real-world questions are rarely simple. You often need to filter by multiple criteria simultaneously. This is where logical operators come in.
1. The AND Operator
Use AND when you need strict filtering. Both conditions must be true for the row to show up.
Scenario: You want to find highly-paid employees specifically in the IT department.
SELECT * FROM employees
WHERE department = 'IT'
AND salary > 60000;
If an employee works in IT but earns 50,000, they are excluded. If they earn 100,000 but work in Sales, they are excluded.
2. The OR Operator
Use OR when you want broad filtering. Only one of the conditions needs to be true.
Scenario: You are organizing a company picnic for the tech and HR teams.
SELECT * FROM employees
WHERE department = 'IT'
OR department = 'HR';
This returns anyone who is in IT, plus anyone who is in HR.
🔹 ORDER BY – Sorting Your Results
When you retrieve data from a database, there is no guarantee it will be in a specific order. It might be sorted by ID, or by when it was inserted, or completely randomly.
To present data professionally, you need to sort it. The ORDER BY clause allows you to organize your results alphabetically, numerically, or chronologically.
The Syntax
ORDER BY comes after WHERE.
SELECT column_name
FROM table_name
ORDER BY column_name [ASC|DESC];
Sorting by Salary
If you want to see who earns the least to the most:
SELECT name, salary FROM employees
ORDER BY salary;
Note: By default, SQL sorts in Ascending (ASC) order (A-Z, 0-9). You don’t have to type ASC, but you can if you want to be explicit.
Sorting in Reverse (Descending)
To see the highest earners at the top, you use the DESC keyword.
SELECT name, salary FROM employees
ORDER BY salary DESC;
Sorting by Multiple Columns
This is a powerful feature for generating reports. You can sort by one column first, and then sort by a second column if there are ties in the first one.
Scenario: List all employees alphabetically by department. Within each department, list the employees with the highest salaries first.
SELECT name, department, salary
FROM employees
ORDER BY department ASC, salary DESC;
What happens here:
- SQL first puts all ‘Accounting’ employees at the top, then ‘Engineering’, then ‘Sales’, etc.
- Inside the ‘Accounting’ group, it sorts those specific people by salary from high to low.
- Then it moves to the ‘Engineering’ group and sorts them by salary from high to low.
🔹 LIMIT – controlling Result Size
When working with massive databases (think Amazon or Facebook scale), you never want to accidentally pull 10 million rows to your screen. It will crash your computer.
The LIMIT clause is your safety valve. It specifies the maximum number of rows the query should return.
The Syntax
LIMIT is almost always the very last thing in your query.
SELECT column_name FROM table_name
LIMIT number;
Example: Previewing Data
If you just want to see what the data looks like without loading everything:
SELECT * FROM employees
LIMIT 5;
This simply grabs the first 5 records it finds and stops.
Real-World Use Case: Top 10 Lists
LIMIT becomes incredibly powerful when combined with ORDER BY. This is the standard way to generate “Top N” lists.
Scenario: Who are the Top 3 highest-paid employees?
SELECT name, salary FROM employees
ORDER BY salary DESC
LIMIT 3;
Logic Flow:
- SELECT gets the data.
- ORDER BY sorts everyone from richest to poorest.
- LIMIT cuts off the list after the first 3 names.
Without the ORDER BY, the LIMIT would just give you 3 random employees. The sorting is crucial for the limit to be meaningful.
🔹 Combining Everything (The “Big Picture” Query)
The true power of SQL queries comes when you combine all these clauses into a single, precise request. As you learn SQL, you will find that most of your queries follow a standard structure.
The Golden Rule of SQL Structure
You must write your clauses in this specific order. If you mix them up, you will get a syntax error.
- SELECT (Pick your columns)
- FROM (Pick your table)
- WHERE (Filter the rows)
- ORDER BY (Sort the remaining rows)
- LIMIT (Restrict the final count)
Detailed Example
The Request: “I need a list of the names and salaries of the top 5 highest-paid employees in the ‘Sales’ department.”
The Query:
SELECT name, salary        -- 1. Show me names and salaries
FROM employees             -- 2. From the employees list
WHERE department = 'Sales' -- 3. Only look at Sales people
ORDER BY salary DESC       -- 4. Rank them highest to lowest
LIMIT 5;                   -- 5. Stop after the top 5
🧠 The Order of Execution (How the Computer Reads It)
Interestingly, the database doesn’t read the query in the same order you write it. Understanding this “invisible” order will help you debug errors later.
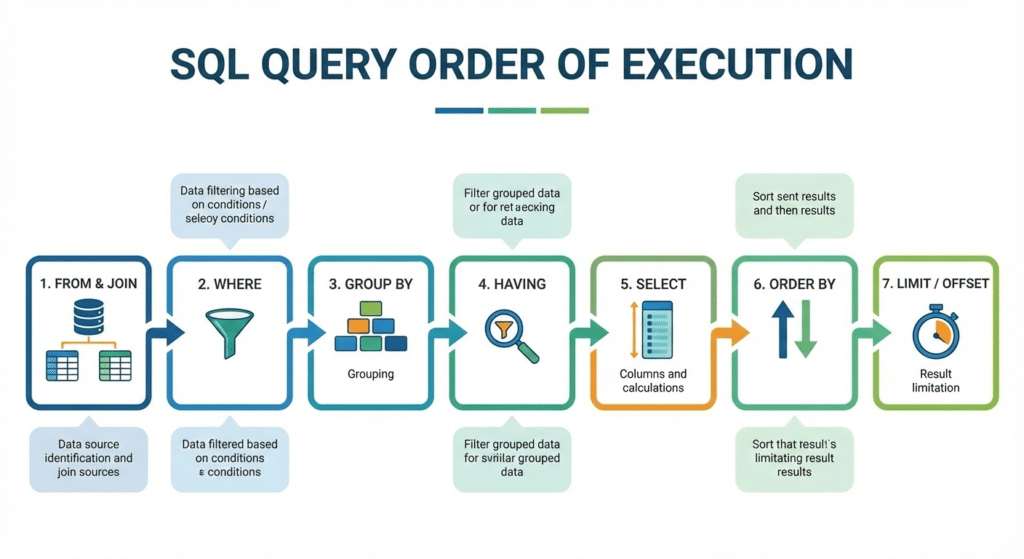
- FROM: First, the database finds the table.
- WHERE: Next, it filters out all the non-Sales people.
- SELECT: Then, it grabs the requested columns (name and salary).
- ORDER BY: Then, it sorts the remaining Sales employees.
- LIMIT: Finally, it trims the list to 5.
⚠️ Common Beginner Mistakes
Even experienced developers make typos. Here are the most common pitfalls to watch out for as you start your SQL tutorial journey.
❌ Forgetting Quotes on Text
Bad: WHERE department = Sales
Good: WHERE department = 'Sales'
Without quotes, SQL thinks Sales is a column name, not a text value. It will throw an error saying “Column ‘Sales’ not found.”
❌ Case Sensitivity
In many databases, ‘Sales’ is not the same as ‘sales’ or ‘SALES’. If your query returns zero results but you know the data is there, check your capitalization inside the quotes.
❌ Using = for NULL
You cannot use WHERE email = NULL. In SQL, NULL represents “unknown” or “nothing.” You cannot equal nothing.
Correct: WHERE email IS NULL or WHERE email IS NOT NULL.
❌ Misplacing the Syntax
Remember the order! You cannot put LIMIT before WHERE. Use the mnemonic S-F-W-O-L (Select, From, Where, Order, Limit) to remember the sequence.
🧪 Practice Section: Test Your Knowledge
The only way to truly learn SQL is to solve problems. Try to write the queries for these scenarios mentally or on a piece of paper before looking at the answers.
Scenario 1
Goal: We need to contact all employees in the “Engineering” team. Retrieve their names and email addresses.
Click to see answer
SELECT name, email FROM employees
WHERE department = 'Engineering';
Scenario 2
Goal: The CEO wants to know which employees are earning less than $40,000 so they can review their compensation. Sort the list alphabetically by name.
Click to see answer
SELECT name, salary
FROM employees
WHERE salary < 40000
ORDER BY name ASC;
Scenario 3
Goal: Find the most recently hired employee in the “HR” department. (Assuming there is a hire_date column).
Click to see answer
SELECT name, hire_date
FROM employees
WHERE department = 'HR'
ORDER BY hire_date DESC
LIMIT 1;
🗺️ What You Learned So Far
Congratulations! You have just navigated the core logic of SQL. By understanding these four commands, you are already equipped to handle about 80% of the daily requests a data analyst receives.
To recap:
- ✔ SELECT allows you to choose specific attributes (columns).
- ✔ WHERE allows you to filter out noise and focus on specific records (rows).
- ✔ ORDER BY helps you organize data for reporting.
- ✔ LIMIT helps you sample data and manage large datasets.
These SQL basics are universal. Whether you use MySQL, PostgreSQL, Microsoft SQL Server, or Oracle, these commands work exactly the same way.
👉 What’s Next? The Journey Continues
Now that you can read data, the next step in your SQL for beginners journey is learning how to change it. Data isn’t static; new users sign up, prices change, and old records need to be removed.
Next Topics to Explore:
- Data Manipulation:
INSERT,UPDATE, andDELETE. - Aggregation: Counting rows (
COUNT), finding averages (AVG), and summing totals (SUM). - Joins: The advanced skill of combining data from two different tables (e.g., matching a
customerto theirorders).
Call to Action:
Don’t let this knowledge fade! The best way to cement these concepts is to practice immediately. Open a free SQL editor online (like SQL Fiddle or DB Fiddle) and try creating a dummy table and running these queries.
Start writing your own SQL queries today—confidence comes from the keyboard, not the textbook.
[Continue to Part 3: Essential Operations (INSERT, UPDATE, DELETE) →]