
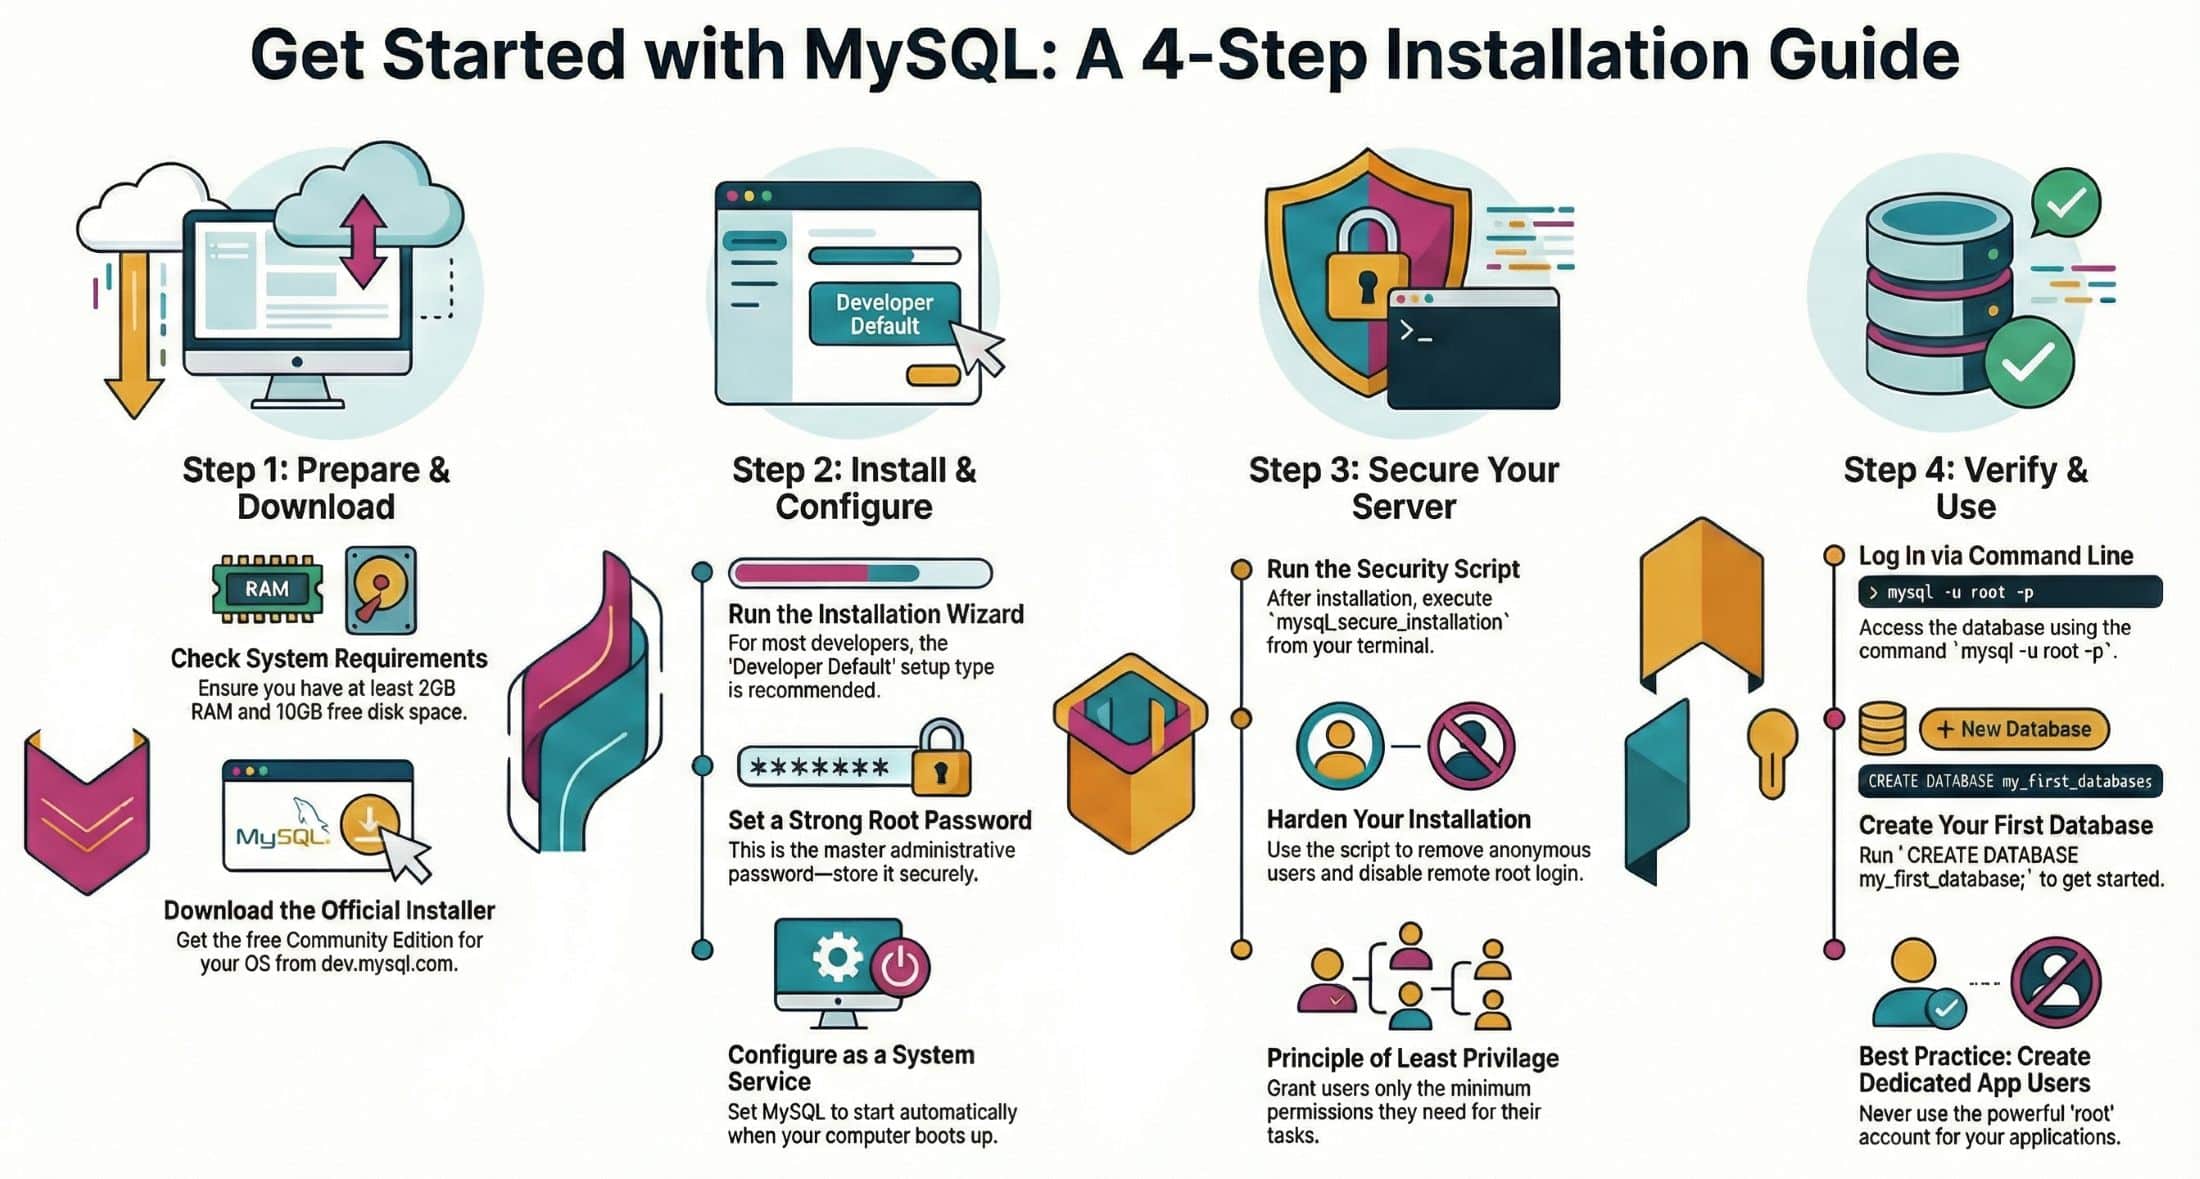
MySQL stands as one of the most widely-used open-source relational database management systems in the world. From small personal projects to massive enterprise applications, MySQL powers millions of websites and applications across the globe. Major companies like Facebook, Twitter, YouTube, and Netflix rely on MySQL to manage their vast amounts of data efficiently and reliably.In this article we will learn How to Install MySQL.
Whether you are a complete beginner taking your first steps into database management, a web developer building dynamic applications, or a seasoned IT professional setting up a new server environment, this comprehensive guide will walk you through every aspect of MySQL installation. We will cover installation procedures for all major operating systems, configuration best practices, security hardening, and troubleshooting common issues.
By the end of this tutorial, you will have a fully functional MySQL database server running on your system, properly configured and secured, ready to support your development projects or production applications. Let us dive into the world of MySQL and get your database server up and running.
Important: This guide covers MySQL Community Edition 8.0 and later versions. The installation process remains largely consistent across versions, though specific details may vary slightly.
1. Understanding MySQL and Its Importance
MySQL is a powerful relational database management system that uses Structured Query Language (SQL) to store, retrieve, and manage data. Originally developed by MySQL AB in 1995 and now owned by Oracle Corporation, it remains free to use under the GNU General Public License for the Community Edition.
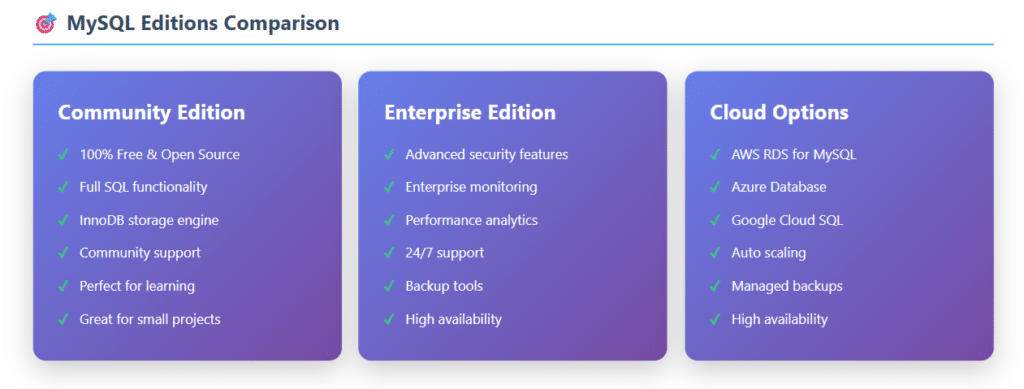
The significance of MySQL in modern web development cannot be overstated. It serves as the backbone for countless web applications, content management systems like WordPress and Joomla, e-commerce platforms, and enterprise software solutions. Its popularity stems from several key advantages that make it an excellent choice for both beginners and experienced developers.
Key Advantages of MySQL
- Open Source and Cost-Free: MySQL Community Edition is completely free to download, install, and use. There are no licensing fees for development or production environments, making it accessible to individuals and organizations of all sizes.
- Exceptional Performance: MySQL is optimized for speed and efficiency. It can handle millions of queries per day and manage databases containing billions of rows, making it suitable for high-traffic websites and applications.
- Scalability: Whether you are building a simple blog or a complex enterprise application, MySQL scales seamlessly. You can start small and expand as your needs grow without switching database systems.
- Cross-Platform Compatibility: MySQL runs smoothly on all major operating systems including Windows, macOS, Linux, and various Unix variants. This flexibility allows developers to work in their preferred environment.
- Robust Security Features: MySQL includes comprehensive security features such as encrypted connections, user authentication, privilege management, and data encryption to protect sensitive information.
- Extensive Community Support: With millions of users worldwide, MySQL boasts an active community providing forums, tutorials, documentation, and third-party tools to help users at every skill level.
2. System Requirements and Prerequisites
Before beginning the MySQL installation process, it is essential to verify that your system meets the minimum requirements. While MySQL is designed to run on modest hardware, ensuring adequate resources will provide better performance and prevent installation issues.
Hardware Requirements
| Component | Minimum Specification |
| Operating System | Windows 10 or later, macOS 10.13 High Sierra or later, Linux with kernel 2.6 or higher (Ubuntu 18.04+, CentOS 7+, Debian 9+) |
| Processor | 64-bit processor (Intel Core i3 or AMD equivalent minimum, Intel Core i5 or better recommended) |
| RAM | 2 GB minimum for basic usage, 4 GB recommended for development, 8 GB or more for production environments |
| Storage Space | 1 GB for MySQL installation files, additional space for databases (varies based on data volume, plan for at least 10 GB free space) |
| Network | Internet connection for downloading installer and updates, not required for local database operation |
Professional Recommendation: For production environments or development work with large datasets, consider using SSD storage instead of traditional hard drives. SSDs significantly improve MySQL performance, especially for read and write operations. Additionally, allocating at least 8 GB of RAM will provide much better performance for applications with multiple concurrent users.
3. Installing MySQL on Windows Operating System
Windows users have the advantage of a dedicated MySQL Installer that simplifies the entire installation process. This installer includes not only the MySQL server but also useful tools like MySQL Workbench, MySQL Shell, and connectors for various programming languages. We will walk through the complete installation process step by step.
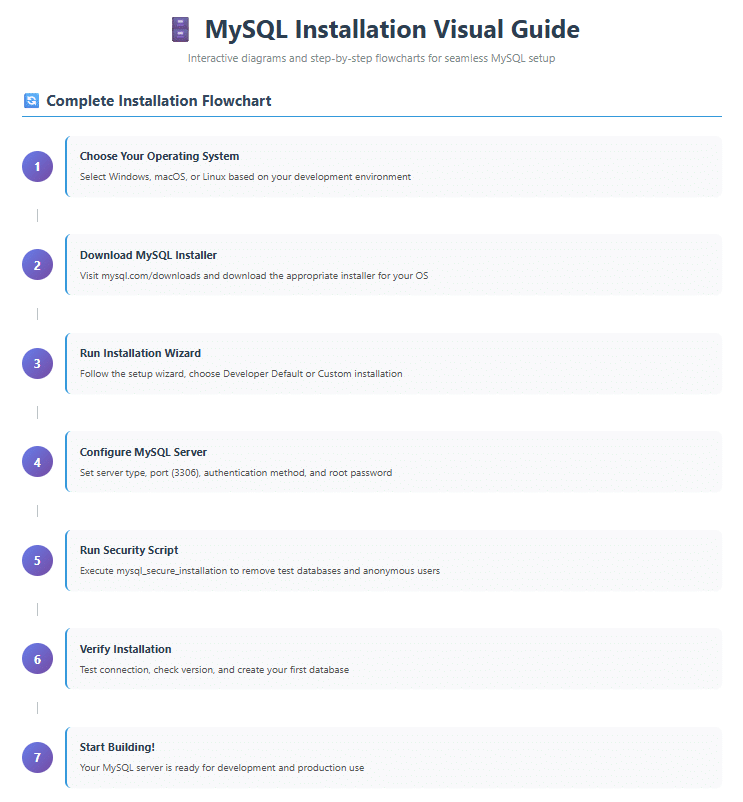
Step 1: Downloading the MySQL Installer
- Open your web browser and navigate to the official MySQL download page
- You will see two installer options: the web installer (smaller, downloads components during installation) and the full installer (larger, contains all components). For the best experience, download the full installer labeled mysql-installer-community.
- Click the Download button next to the larger file size (typically around 300-400 MB)
- On the next page, you can optionally create an Oracle account or simply click on the link that says No thanks, just start my download at the bottom of the login form
Step 2: Running the Installation Wizard
- Locate the downloaded MSI file in your Downloads folder and double-click to launch it
- If Windows User Account Control prompts you, click Yes to allow the installer to make changes to your system
- The MySQL Installer welcome screen will appear. Click Next to continue
- Read and accept the license agreement, then click Next
Step 3: Choosing Installation Type
The installer offers several setup types. Here is what each option includes:
- Developer Default: Installs MySQL Server, MySQL Workbench, MySQL Shell, connectors for various programming languages, and documentation. This is the recommended option for developers.
- Server Only: Installs only the MySQL Server without additional tools. Choose this for production servers where you only need the database engine.
- Client Only: Installs client tools and libraries without the server. Useful when connecting to a remote MySQL server.
- Full: Installs everything available including all connectors, documentation, and samples.
- Custom: Allows you to manually select which components to install. This gives you complete control but requires more knowledge.
For most users learning MySQL or developing applications, select Developer Default and click Next. The installer will check for any missing requirements and offer to install them if needed.
Step 4: Server Configuration
After the files are installed, you will reach the configuration stage. This is where you set up how MySQL will operate on your system.
Type and Networking Configuration:
- Config Type: Select Development Computer unless you are setting up a dedicated database server. This option uses minimal memory.
- Connectivity: Leave TCP/IP enabled and use the default port 3306. Only change this if you have another service using that port.
- Named Pipe: You can leave this disabled for most installations.
Authentication Method:
Choose Use Strong Password Encryption for Authentication (RECOMMENDED). This uses the caching_sha2_password authentication plugin which provides better security. Only select the legacy option if you need compatibility with very old client applications.
Accounts and Roles:
- Enter a strong password for the MySQL root user. This is the administrative account with full privileges. Important: Make sure to remember this password as you will need it to manage your MySQL server.
- Optionally, you can add additional user accounts here, but it is usually better to create these later through MySQL Workbench or the command line after you understand user permissions better.
Windows Service Configuration:
- Service Name: Leave as MySQL80 or the default provided
- Start MySQL Server at System Startup: Check this box if you want MySQL to start automatically when Windows boots. This is recommended for development machines.
- Run Windows Service as: Select Standard System Account for most installations.
Step 5: Completing the Installation
- Click Execute to apply all the configurations you have specified
- The installer will configure the MySQL server and start the service. Wait for all configuration steps to show green checkmarks
- Once complete, click Finish
- If MySQL Workbench was installed, you can optionally launch it to test your connection
- Click Finish on the final screen to exit the installer
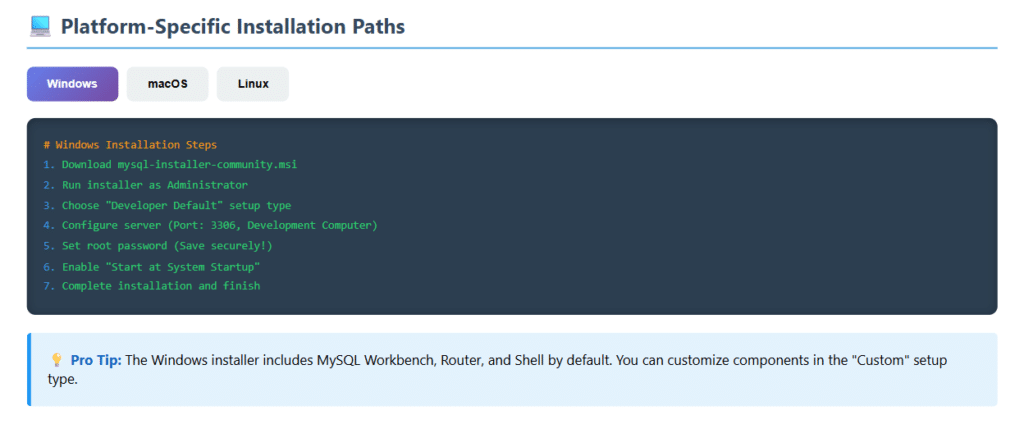
4. Installing MySQL on macOS
macOS users can install MySQL using either the native DMG package installer or through Homebrew, a popular package manager for macOS. Both methods are straightforward, but the DMG package provides a graphical interface while Homebrew offers command-line convenience.
Method 1: Installation Using DMG Package
This is the recommended method for users who prefer a graphical installation process:
- Visit this in your web browser
- Under the Select Operating System dropdown, choose macOS
- Select the appropriate version for your Mac. Choose ARM 64-bit for Apple Silicon Macs (M1, M2, M3 chips) or x86 64-bit for Intel-based Macs
- Download the DMG Archive file
- Once downloaded, double-click the DMG file to mount it
- Double-click the PKG installer file inside the mounted disk image
- Follow the installation wizard. Click Continue through the introduction and license agreement screens
- Select the installation location (typically your main hard drive)
- During installation, you will be prompted to set a root password. The installer will also generate a temporary password which will be displayed in a dialog box. Make sure to save this password in a secure location
- Complete the installation by clicking Install and entering your macOS administrator password when prompted
Post-Installation Steps for DMG Method:
- Open System Preferences (or System Settings on macOS Ventura and later)
- Click on the MySQL preference pane at the bottom of the window
- Click Start MySQL Server to start the database service
- Check the box for Automatically Start MySQL Server on Startup if you want MySQL to start every time you boot your Mac
Method 2: Installation Using Homebrew
If you have Homebrew installed on your Mac (install it from here if you do not), this method provides a quick command-line installation:
Open Terminal application and run these commands:
brew install mysql
This command downloads and installs MySQL along with all necessary dependencies. After installation completes, start the MySQL service:
brew services start mysql
To verify that MySQL is running, use:
brew services list
You should see MySQL listed with a status of started. Now run the security installation script:
mysql_secure_installation
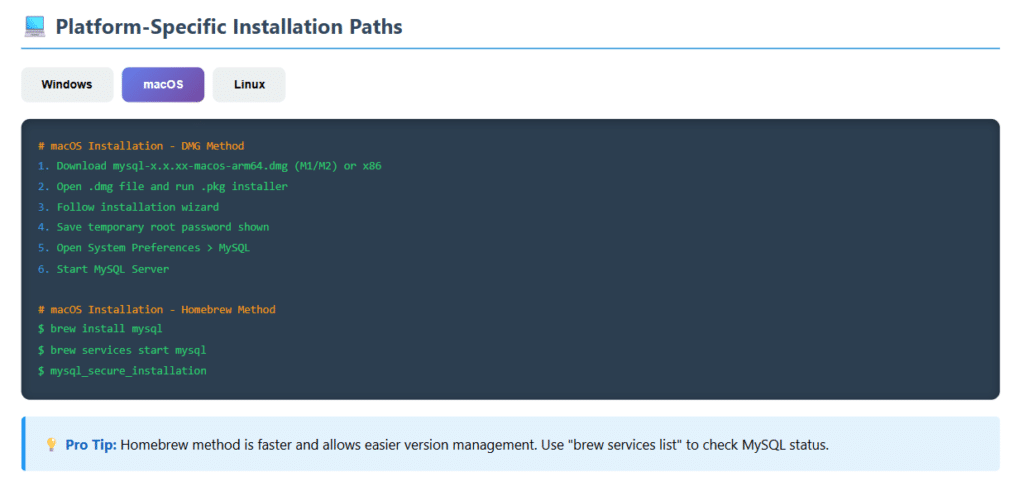
This interactive script will walk you through securing your MySQL installation by setting a root password, removing anonymous users, disabling remote root login, and removing test databases.
5. Installing MySQL on Linux Distributions
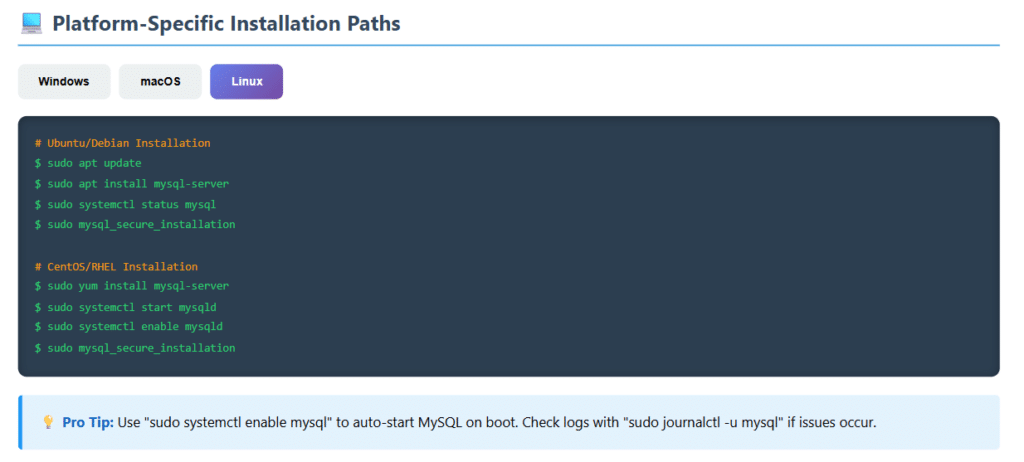
Linux users have the advantage of simple package manager installations. The process varies slightly between distributions, but the core concepts remain the same. We will cover Ubuntu and Debian-based systems in detail, with notes for other popular distributions.
Installation on Ubuntu and Debian
Step 1: Update System Packages
Before installing any new software, it is best practice to update your package index and upgrade existing packages:
sudo apt update sudo apt upgrade -y
Step 2: Install MySQL Server
Install the MySQL server package using the APT package manager:
sudo apt install mysql-server -y
The installation process will download MySQL and its dependencies, then automatically install and start the MySQL service. The -y flag automatically answers yes to all prompts.
Step 3: Verify Installation and Service Status
Check that MySQL is running properly:
sudo systemctl status mysql
You should see active (running) in green text in the output. If the service is not running, start it with:
sudo systemctl start mysql
To ensure MySQL starts automatically when your system boots:
sudo systemctl enable mysql
Step 4: Secure Your MySQL Installation
Run the security configuration script:
sudo mysql_secure_installation
This interactive script will guide you through several security-related questions:
- VALIDATE PASSWORD COMPONENT: Choose whether to enable password validation plugin (recommended for production)
- Set root password: Enter a strong password for the MySQL root user
- Remove anonymous users: Select Yes to remove anonymous access (recommended)
- Disallow root login remotely: Select Yes for better security (recommended)
- Remove test database: Select Yes to remove the test database (recommended)
- Reload privilege tables: Select Yes to apply all changes immediately
Installation on Other Linux Distributions
For CentOS, RHEL, and Fedora:
sudo yum install mysql-server
sudo systemctl start mysqld
sudo systemctl enable mysqld
sudo mysql_secure_installation
For Arch Linux:
sudo pacman -S mysql
sudo mysqld --initialize --user=mysql --basedir=/usr --datadir=/var/lib/mysql
sudo systemctl start mysqld
sudo mysql_secure_installation
6. Post-Installation Configuration Steps
After successfully installing MySQL, there are several important configuration steps to complete before you start using your database server for projects. These steps will help you create your first database, set up user accounts, and configure MySQL for optimal performance.
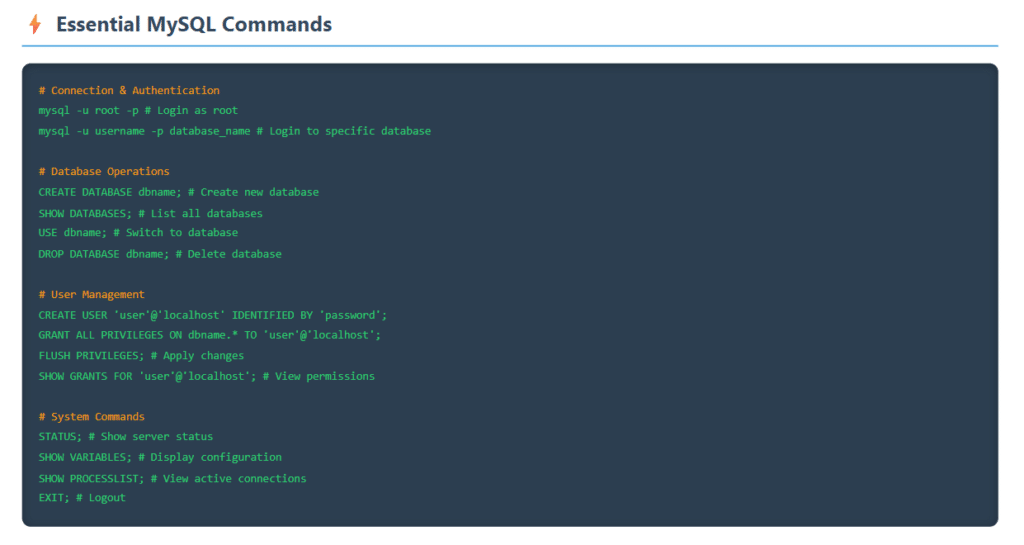
Accessing the MySQL Command Line
To interact with MySQL, you need to access the MySQL command-line client. The process differs slightly by operating system:
On Windows:
Open Command Prompt or PowerShell and type:
mysql -u root -p
On macOS and Linux:
Open Terminal and type:
mysql -u root -p
Press Enter, and you will be prompted to enter the root password you created during installation. Once authenticated, you will see the MySQL prompt which looks like: mysql>
Creating Your First Database
Let us create a sample database and table to verify everything is working correctly:
CREATE DATABASE my_first_database;
SHOW DATABASES;
USE my_first_database;
Now create a simple table:
CREATE TABLE users (
user_id INT AUTO_INCREMENT PRIMARY KEY,
username VARCHAR(50) NOT NULL UNIQUE,
email VARCHAR(100) NOT NULL,
created_at TIMESTAMP DEFAULT CURRENT_TIMESTAMP );
Insert some sample data:
INSERT INTO users (username, email) VALUES ('john_doe', 'john@example.com');
INSERT INTO users (username, email) VALUES ('jane_smith', 'jane@example.com');
SELECT * FROM users;
If you see the data you just inserted, congratulations! Your MySQL database is working perfectly.
Creating Application Users
It is a critical security best practice to never use the root account for applications. Instead, create dedicated user accounts with limited privileges. Here is how to create a new user and grant appropriate permissions:
CREATE USER 'webapp_user'@'localhost' IDENTIFIED BY 'SecurePassword123!';
GRANT ALL PRIVILEGES ON my_first_database.* TO 'webapp_user'@'localhost';
FLUSH PRIVILEGES;
This creates a user named webapp_user who can only access the my_first_database database from the local machine. To verify the user was created:
SELECT user, host FROM mysql.user;
7. Securing Your MySQL Installation
Database security is paramount, especially when your MySQL server will be accessible over a network or contains sensitive data. While we ran the mysql_secure_installation script earlier, there are additional security measures you should implement to protect your data.
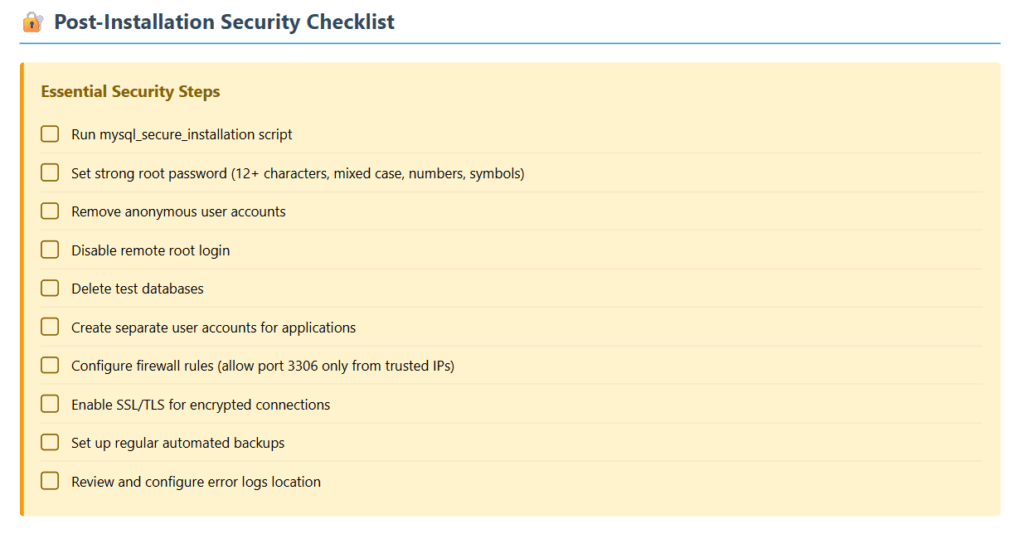
Essential Security Checklist
- Use Strong Passwords: All MySQL user passwords should be at least 12 characters long and include uppercase letters, lowercase letters, numbers, and special characters. Never use dictionary words or common passwords.
- Implement the Principle of Least Privilege: Grant users only the minimum permissions they need. For example, an application that only reads data should not have DELETE or UPDATE privileges.
- Disable Remote Root Access: The root user should only be accessible from localhost. Never allow root to connect from any remote host.
- Remove Anonymous Users: Delete any anonymous user accounts that allow login without authentication.
- Change the Default Port: While not mandatory, changing from the default port 3306 to a custom port can reduce automated attack attempts.
- Enable SSL/TLS Encryption: For any remote connections, require encrypted connections using SSL/TLS certificates.
- Configure Firewall Rules: Use your operating system’s firewall to restrict MySQL access to only trusted IP addresses.
- Regular Updates: Keep MySQL updated with the latest security patches. Subscribe to MySQL security announcements.
Implementing Firewall Protection
On Ubuntu/Debian using UFW:
sudo ufw allow from 192.168.1.100 to any port 3306
sudo ufw enable sudo ufw status
On CentOS/RHEL using firewalld:
sudo firewall-cmd --permanent --add-rich-rule='rule family="ipv4" source address="192.168.1.100" port port="3306" protocol="tcp" accept' sudo firewall-cmd --reload
8. Verifying and Testing Your Installation
After installation and configuration, it is important to thoroughly test your MySQL installation to ensure everything is functioning correctly. Here are comprehensive verification steps.
Check MySQL Version
mysql --version
This command should display the MySQL version number, for example: mysql Ver 8.0.35 for Linux on x86_64
Test Database Connection
mysql -u root -p -e "SELECT VERSION(), CURRENT_DATE;"
This command logs in, executes a simple query, and displays the results. If successful, you will see the MySQL version and current date.
Verify Service Status
Windows:
net start | findstr MySQL
Linux/macOS:
sudo systemctl status mysql
9. Common Installation Problems and Solutions
Even with careful installation, you may encounter issues. Here are the most common problems and their solutions.
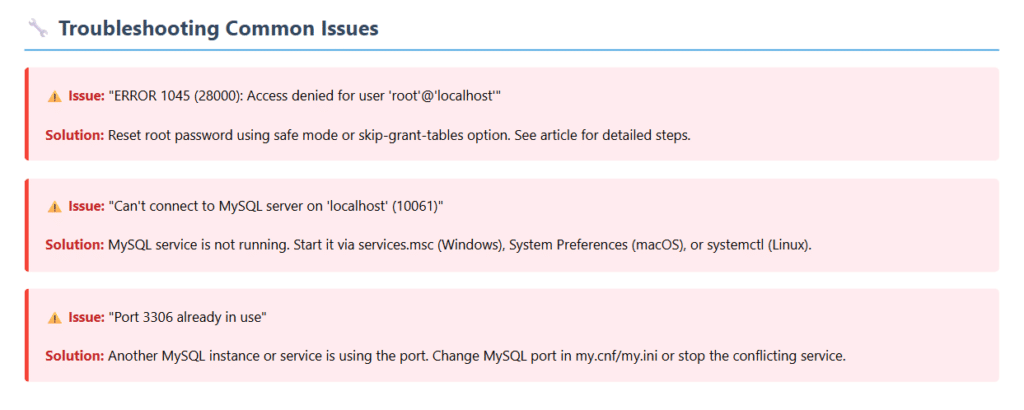
Problem 1: Port 3306 Already in Use
Symptoms: Installation fails or MySQL service will not start, error message mentions port 3306 is already bound.
Solution:
- Check what is using the port: netstat -an | grep 3306 (Linux/Mac) or netstat -an | findstr 3306 (Windows)
- Either stop the conflicting service or change MySQL to use a different port by editing the MySQL configuration file
Problem 2: Access Denied Error
Symptoms: Cannot log in, receive ERROR 1045 (28000): Access denied for user
Solution:
Reset the root password by starting MySQL in safe mode, then changing the password using ALTER USER command.
Problem 3: Service Will Not Start
Symptoms: MySQL service fails to start, no error in console.
Solution:
- Check error logs located in /var/log/mysql/error.log (Linux) or MySQL data directory (Windows)
- Verify file permissions on MySQL data directory
- Ensure sufficient disk space is available
10. Essential Tips and Best Practices
To get the most out of your MySQL installation and avoid common pitfalls, follow these best practices from the start.
- Regular Backups: Implement automated backup strategies using mysqldump or MySQL Enterprise Backup. Test your backups regularly by performing restore operations on a test server.
- Monitor Performance: Use MySQL’s built-in performance monitoring tools like SHOW STATUS, SHOW PROCESSLIST, and the Performance Schema to identify bottlenecks.
- Optimize Queries: Use the EXPLAIN statement to analyze query execution plans and create appropriate indexes on frequently queried columns.
- Maintain Separate Environments: Always maintain distinct databases for development, testing, and production to prevent accidental data loss or corruption.
- Document Your Schema: Keep detailed documentation of your database schema, including entity relationship diagrams and table descriptions.
- Use Version Control for Schema Changes: Track all database schema modifications using migration tools like Flyway or Liquibase.
- Stay Updated: Regularly check for MySQL updates and security patches. Subscribe to the MySQL newsletter for announcements.
How to Install MySQL: Step-by-Step Setup Guide for Beginners
MySQL is one of the most popular open-source relational database management systems, powering millions of websites and applications worldwide. This comprehensive guide will walk you through the installation process on Windows, macOS, and Linux, with detailed configuration and security best practices.
Frequently Asked Questions About MySQL Installation
Lets have a Quiz to measure the understanding of this article: